Basic Photography 101
Rule Number 1: No Foggy lens

Be extra vigilant: Especially in the morning when the lens tends to be a little cold
Always check your lens for fogginess or water droplet before EVERY SINGLE SHOT.
NEVER clean the lens with your shirt or buff, it leaves an oily stain on the lens that is not visible to you but will severely reduce image quality.
our editors are NOT able to save a foggy image, so that would be a useless shot.
if the lens is foggy, the camera auto focus function will be affected, so the image wont be in focus
Do not chop off their legs / kayak (for starting shot)

the legs looks like it was awkwardly chopped off, same for the kayak
include the whole body and the whole kayak in the shot.
including the coconut trees at the back will add a better island vibe.
Rule of Thirds

Use the grid line on the camera to frame your shot
Put the horizon at top or bottom 1/3 line
Put your subject in the crosshairs of the yellow lines.
You can apply the rule of thirds to any shot
Rule of Third (Scenery)

When taking a movement shot, give your subject a place to go
Give some empty space in the direction of travel
Rule of Thirds (fish pose)

1/3 horizon line
the fish and the guest are perfect placed in the crosshairs
Something to Look at

When fishing or fighting a fish, give them some same on the side that they are looking at.
take in 50mm zoom
Finding Balance: middle

If the fish is right in the middle, to create a balance image, the person should also be in the middle, so no side of the image feels too heavy
Finding Balance: Fish pose (holding the fish)

Important: This applies to fever classic pose and boga images too
Its better to put the fish a little to the left or right side of the image, then balance out the fish by having the guest on the opposite side of the image
Finding Balance: Fish pose (boga)

Here’s another example of a balanced image
The horizon line is at 1/3
the fish on the right is balanced out by the weight of the guest on the left side
Finding Balance: Fish pose (rod)

The horizon line is at 1/3
the fish on the right is balanced out by the weight of the guest on the left side
Steady hands

When taking photo in full zoom
Remove all vibration and movement.
Stop your kayak
Hold the camera as steady as you can
Especially in low light condition i.e early morning/cloudy days/rainy days.
Any movement will cause the image to be out of focus
Stop shooting a dead horse

Think before you shoot
Ask yourself, what is the story here?
If the story is, Henry fishing on a kayak, then take a GREAT photo of henry fishing on a kayak, better to have 1 good shot vs many mediocre shots.
Do not take henry fishing on a kayak again unless you can make the photo look vastly different from the first. (a change in story)
We don’t need 10 versions of ‘Henry fishing on a kayak’ the next 9 versions adds little value to the final photo set.
Same exact story. (if they look they same, they are the same)

The person caught 3 different fish at 3 different times during the trip but the 3 photos here all look the same
IF they look they same, they are they same, so the photos are not adding any value to the final photo set.
If the person catch a different fish, make sure the photo looks different, different framing, different pose (framing, so closer or zoom in)(pose: hold the fish, eat the fish….)
Even if your guests keeps catching the same fish, the way to make it look like they caught many fishes is to make the photo look uniquely different from each other
Lighting

Front Light, 45 degrees lighting, and side light retain the most information. (80% of your shots)
Try not to take in Rim light and Back light. (it does look good sometimes, 20% of your shots can be with Rim light and back light
information: colours, white balance, clarity, skin tone.
Why not backlit: back lit means only 1 element will be properly lit (exposed), either the subject or the sky, only 1
Why side light, and 45 degree is best? All element , the subject and the background will be properly lit (exposed).
Early Morning / Low Light Condition

you want as much light to enter the lens, so the lower the aperture the better. (as long as you are in auto, this will be automatic)
Because of low light, the camera shutter will be slower, meaning it takes the camera a little longer to take the photo, so if there is any shake, it will be very obvious.
DO NOT do full zoom, it will increase the camera shake
Take in 16mm only in low light condition.
Camera Angles
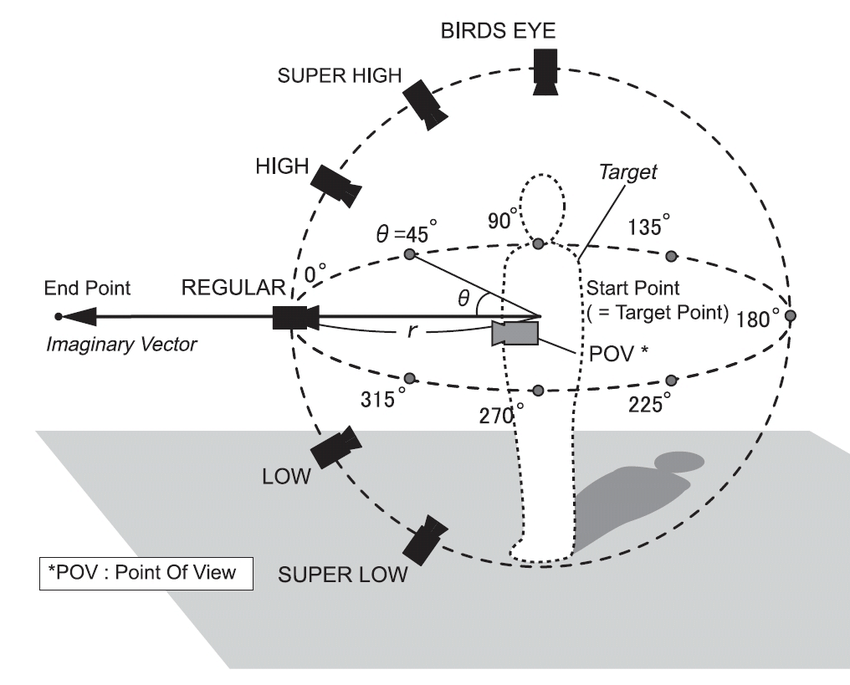
varying the camera angles would create new shots
eye level is what we are all used to, we see the world from this view every single second of the day, find an interesting angle / perspective, in our context, choose a lower angle.
Go with more low angles shots.
Drone shots are interesting to us because they create a brand new perspective, so low angles shot also does the same thing, helping the audience ‘see’ from a new perspective.
Take only landscape

landscape allows us to use it as a landscape and also easily crop it for square and portrait image
it’s more difficult with landscape images.
Avoid taking 90 degrees from the side

Avoid taking too many photos 90 degrees from the side
WHY?
- Big gap between the 2 person on the kayak, not so nice
- hard to see the face unless you get them to look at you
- boring story, could be told better with other shotsWhat to do instead?
- Take 45 degrees or more from the front, so can see the facial expression, that is the main story
- to do that, you have to be ahead of them, or you have to move around.
- taking front 45 or less from the front also closed the ‘gap’ between the 2 person.When to take 90 degrees from the side?
- When you are taking a scenery shot, when the story is the scenery and the kayak is there to give it a sense of scale (see scenery shot)
Don’t shoot without thinking. (the in between shot)

This shot is caught in the middle of a ‘action’ shot and a ‘scenery’ shot.
This shot is bad because is does not do justice to a ‘action’ shot (we can barely see the face or the action) and we does not do justice to a ‘scenery’ shot (can bare see any scenery)
You can only have 1 main hero (subject) in the image, you can’t have both. either the action or the scene
So before you shoot, decide what is the ‘shot' then shoot that shot.
Possible ‘action’ shots, (GREEN rectangles)
Possible ‘scenery’ shots, (ORANGE rectangles)
See below for examples.
Action shot Vs Scenery shot

A rule of thumb is: you are either taking an action shot or a scenery shot, nothing in between.
the examples beside shows that the action shots and scene shots are distinctively different.
Check point for scene:
1) hero scene
2)kayak looks small
3) rule of thirdCheck point for action shot
1) think action word, know what is that action word and make sure your framing tight on that action.
action word: eat, laugh, jump, pull etc..
2) usually in zoom, but not always, we can get up close with 16mm wide as well.
Remove distracting elements

isolate your Hero
make is look like a PRIVATE trip
remove the distraction to tell a better story.
Face vs Back of Head

Don’t take the back of the head, there is no story there, the story is in the facial expression.
Don’t shoot from behind the kayak
No Diagonal Images

Make sure the horizon is horizontal
When we have to crop diagonal images back to horizontal, we have to crop out a lot of the sides
Tell the full story

When in punggol, it is better to shoot from the front so that the background shows more of the waterway.
Image left: story: he could be kayaking anywhere
Image right: story: kayaking in punggol waterway
How to create depth

you’ll need foreground, mid-ground and background
you need at least 2 to create depth, if any of the 2 are too close together, then you wont have depth